Memory Verse:
Galatians 5:22-23, “But the fruit of the Spirit is love, joy, peace, patience, kindness, goodness, faithfulness, gentleness, and self-control.”
Other Scripture References:
I Corinthians 13:4-7
Teaching Concepts:
Children learn how the Holy Spirit helps us become more like Jesus. They learn that as we grow in Christ, the Holy Spirit helps us produce pleasing fruit and glorifies God.
Early Arrivers Activity
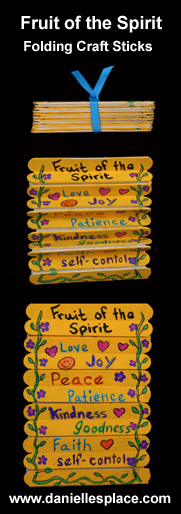
1. Fruit of the Spirit Folding Craft Stick Bible Craft for Sunday School
Craft sticks are taped together so that when they are pushed together from the top and bottom of the row, they fan fold up into a compact stack of sticks for storage. This craft is great to use as a memorization tool. Children can test themselves by unfolding one section at a time to reveal the next Fruit of the Spirit.
What you will need:
Woodsies Mini Jumbo Craft Sticks -4.5″ 50/Pkg – Use good quality craft sticks that lay flat. The 5/8″ work perfectly with the one-inch tape.
*You can use the Woodsies Jumbo Craft Sticks with the 1.5 Inch – 3M Scotch Masking Tape for a bigger Canvas.
3M Scotch Masking Tape, 1-Inch – Other brands will work, but this tape works great! It is the exact color of the craft sticks. (Staple’s Tape works better with the washable markers, but it is lighter than the stick, more transparent, and doesn’t cover the stick as well.)
Permanent Markers, Crayons, or Colored Pencils (The washable markers don’t work well because they smear.)
How to Make the Folding Craft Stick Canvas:
1. Cut the one-inch masking into 4-inch pieces.
2. Place two sticks side by side and tape them together, covering both the sticks with the tape.
3. Turn the two sticks over so that they are diagonal to you.
4. Place another craft stick next to and below the two sticks you taped together. Use another piece of tape to tape the bottom two sticks together.
5. Turn all three sticks over diagonally, place another stick at the bottom of the row, and tape the last two sticks together. Keep going until you have a whole row of sticks.
6. You can also cover the first and last stick in the row by placing tape over the stick and then folding it back over the stick. It is easier to write on the tape than on the craft stick. The ink soaks into the sticks and blurs.
7. Children can use permanent markers, pens, or colored pencils to write the Bible verse on the sticks and then decorate them. They can also draw a picture on the back of the sticks representing the Ten Commandments.
If a child messes up while working on his canvas, you can pull off the tape where he messed up and replace it with new tape.
These folding craft stick canvases can also be used for many other purposes. You can also be used to make greeting cards for Mother’s Day, Father’s Day, or Birthdays.
View a video on Youtube with instructions on how to make this craft:
©2012, Digital by Design, Inc. – See Copyright Information – Bloggers, if you use this craft idea or an adaptation, you must link back to this page for complete directions. If you use this technique, let us know, and we will put a link to your blog.
2. Make Fruit of the Spirit Folding Craft Sticks
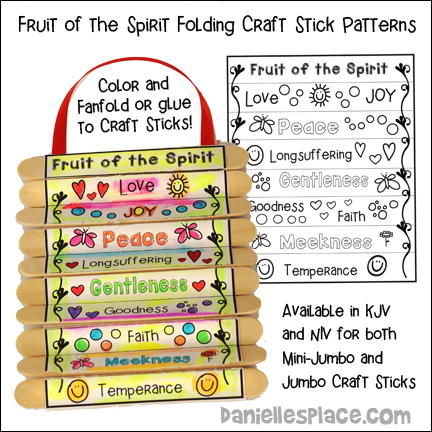
These are basically the same as the folding crafts sticks above, except children color the pattern and glue it to the craft sticks. If you don’t have a lot of time or help, prepare the craft sticks ahead of time and have your children color them in class. You can also make this craft without the craft sticks; just have the children fan-fold the finished pattern. Fan-folding on the lines can be difficult for any age. Use a Scoring Tool or blunt object to score the lines before class to make the papers easier to fold.
What you will need:
Ribbon or Yarn
Scissors
Uchida 530-6C Marvy Brush Tip Fluorescent Color Fabric Marker Set (These markers are designed for fabric, but they work great on paper. The fluorescent colors are brighter than highlighter markers and the tips are much softer.) or Highlighter Markers
Jumbo Craft Sticks or Mini Jumbo Craft Sticks
How to Make Folding Craft Stick Cards:
1. Before class, print out the patterns you want to use.
Jumbo Craft Stick Patterns
Mini-Jumbo Craft Stick Patterns
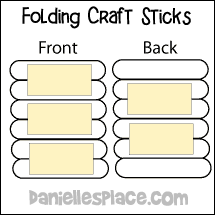
2. Line up eight jumbo craft sticks or ten mini-jumbo craft sticks, one on top of the other.
3. Spread glue on the back of a cardstock square and stick it to the middle of the craft sticks, pressing down and out from the middle of the paper.
4. Turn the craft sticks over and glue the ribbon so that you can hang up the finished craft. Glue the blank pattern to the back of the craft sticks covering the ends of the ribbon.
5. Let the glue dry completely, which could take up to an hour. When the glue is completely dry, use an Exacto knife or box cutter to cut the paper. On one side, carefully cut the paper in the space between the first and second craft stick. Do not cut all the way through to the paper on the other side. Skip the next space and cut the area between the third and fourth craft sticks. Skip the next space and the top paper between the fifth and sixth craft sticks.
6. Turn the card over and cut the paper in the space between the second and third craft sticks, the fourth and fifth, and the sixth and seventh.
7. Carefully fold up the craft sticks.
Watch a Video on How to Make the No-tape, Folding Craft Stick Cards:
3. Taste Fruit
Bring in cut-up pieces of fruit and let the children taste them. Talk about fruit.
4. Fruit of the Spirit Poster
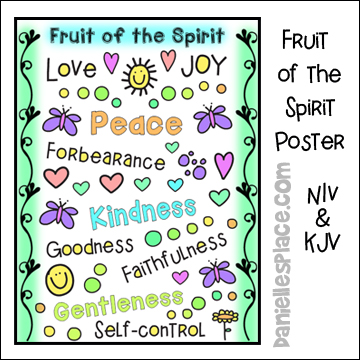
What you will need:
Paper
Markers
Highlighter Markers
Colored Pencils
How to make:
1. Before class, print out the pattern and make copies.
2. In class, have your children color the pictures. Talk about the fruits as the work. Ask them to give examples of each fruit.
The Lesson
Preparation: You will need plastic fruit to represent each of the fruit of the Spirit used in the lesson below.
To keep the children’s attention and give them an incentive to listen, you can tell them that you will have a short quiz at the end of the lesson and the person who does the best will win a prize.
Review last week’s lesson on “The Vine and the Branches” “I am the vine; you are the branches. If you remain in me and I in you, you will bear much fruit, apart from me you can do nothing.” John 15:5
Last week we talked about the vine and branches. Jesus is the vine, and we, as Christians, are the branches. God, the gardener, wants us to produce fruit. We can only produce fruit if we stay attached to the vine or Jesus. In order to remain attached to Jesus, we must read our bibles, pray, study, worship, etc. God prunes the branches and cuts off any branches that don’t produce or any branches that use up the energy needed to produce fruit. Through studying God’s words and obeying God, we are pruned. He cuts out any bad things in our lives that keep us from living Christ-like lives. If you remain in Christ, you will become more like Jesus every day. When people see you, they should see Christ living through you.
Today we will learn more about the fruits that God wants us to produce. The fruits that we produce are the characteristics of Christ (Christ-like qualities). When you ask God to forgive you of your sins and ask Jesus into your heart, God forgives you and makes you clean. You become a new person. Your old self is gone. He gives you his Holy Spirit to guide and show you how to live and become more like Christ.
Let’s read Gal. 5:22-23 and find out what kind of person Jesus is and what type of person God wants you to be. Does someone want to read this verse? “But the fruit of the Spirit is love, joy, peace, patience, kindness, goodness, faithfulness, gentleness, and self-control.”
Love – Apple
Today we are going to use an apple to represent love. It’s kind of shaped like a heart and is round. Love is the key to all the other fruits. John 13:34 – “Love one another. As I have loved you, so you must love one another.” Love means to put other people’s feelings before your own. To care about people more than yourself, even those who aren’t loving.
Joy – Cherries
I am using cherries to represent joy. We can associate joy with cherries if we think of the word cheer, which means joy. So we have cheery cherries. Philippians 4:4 “Rejoice in the Lord always. I will say it again: Rejoice!” God wants us to be happy in all situations because “We know that in all things God works for the good of those who love him.” (Romans 8:28) Even when things don’t go our way, we should be happy.
Peace – Peach
I am using the peach to help us remember peace. The first four letters of peach and peace are the same. John 14:27, “Don’t worry about anything; instead, pray about everything . . . If you do this, you will experience God’s peace, which is far more wonderful than the human mind can understand.” TLB Peace means that we put our trust in God. That we don’t worry about anything because we know that God has everything in his hands.
Patience – Pineapple
(NIV – Forbearance) (KJV – Longsuffering) – Let’s use a pineapple to remind us about patience. Patience and pineapple start with the same letter, and you have to be very patient when you are cutting up a pineapple. It is very prickly, and you will get pricked if you don’t take your time. Ephesians 4:2, “Be patient, bearing one another in love.” Patient means waiting on something or someone without getting angry or upset. It means you are slow to get angry.
Kindness – Banana
(NIV only) Let’s use a banana to remind us of kindness. If you peel down two sides of a banana, it looks like it has arms. Think of the banana using its arms to be helpful and kind. Ephesians: 4:32, “Be kind and compassionate to one another, forgiving each other, just as in Christ God forgave you.” When you are kind, you treat everyone nicely. You treat others the way you would like to be treated. You are helpful and friendly. If you turn the banana longways with the sides pointing up, it looks like a smile. Bananas can remind you of kindness because people who are kind smile.
Goodness – Grapes
Let’s use grapes to remind us to be good. Grapes and goodness both start with “g.” Philippians 4:8, “Whatever is true, whatever is noble, whatever is right, whatever is pure, whatever is lovely, whatever is admirable–if anything is excellent or praiseworthy–think about such things.” Everyone knows what goodness is. We should always concentrate on things that are right, pure, lovely, admirable, praiseworthy, and noble and avoid things that keep us from being good.
Faithfulness – Pear (KJV – Faith)
Let’s use a pear to represent faithfulness. Husbands and wives are pairs, and they are supposed to be faithful to each other. Hebrews 11:6, “And without faith it is impossible to please God because anyone who comes to him must believe that he exists and that he rewards those who earnestly seek him.” When you are faithful, people can depend on you. You don’t break your promises. You keep your word. If you tell someone you will do something, you do it.
Meekness – Mango
(KJV only) – Let’s use a mango to remind us of humility since they both start with the letter “M.”
Gentleness – Tomato
Let’s use the tomato to remind us to be gentle. You must be very gentle with tomatoes because they have very thin skins and can be squashed easily. (Philippians 4:5) “Let your gentleness be evident to all.” You are gentle when you are caring and sensitive to others’ feelings. When you are gentle, you are careful not to hurt others by what you say or do.
Self-Control – Strawberry (KJV – Temperance)
Let’s use the strawberry to remind us to use self-control. Strawberry and self-control both start with the same letter. 1 Peter 1:13, “Prepare your minds for action; be self-controlled; set your hope fully on the grace to be given you when Jesus Christ is revealed.” You should be in control of your body, your thoughts, and your mouth at all times. Sometimes we feel like doing things that we know we’re not supposed to. If we exercise self-control, we don’t do it.
Discussion Time
Ask the children to think about the different fruits of the Spirit and which one or ones they think they need to work on the most.
Quiz Time
Hand out the quiz papers.
Tell the children they have five minutes to complete the quiz and give it back to you. The person who answers the most questions right wins. If you have more than one winner, you can determine the tiebreaker by seeing who can write all the fruit of the Spirit in a certain amount of time.
Prayer
Father, We thank you for sending your son, Jesus, to teach us how to be pleasing in your sight. Thank you for giving us the Holy Spirit to guide and help us become more like Jesus so we can glorify you. Amen
Activity
1. Play a “Pass the Fruit Game”
You will need plastic fruit that represents the fruits used in the lesson. You don’t have to use all of them if you can’t find all the fruits. If you can’t find plastic fruit, you can use pictures of fruit. Have the children sit in a circle or around a table. Explain to the children that you are going to pass a fruit to the person on your left and tell them what it represents. The person on the left then passes the fruit to the person on his left and tells them what it represents. Then explain that you will also pass fruit to the person on your right, and they will do the same thing so that fruit is going in both directions at the same time. Keep the fruit going around the circle until the children get really confused.
Crafts
1. Make a Fruit of the Spirit Wall Hangings or Coloring Sheet
 You can use this pattern to make a banner or just use it as a coloring sheet.
What you will need:
White Paper and Wooden Dowels or White or Off-white Cotton Muslin Material (About $1.00 a Yard)
T-shirt Transfer Material
Pinking Shears
Watercolor Markers (Highlighter Markers)
Ribbon or Thin Rope
Sewing Machine or Needle and Thread or Glue
How to make:
1. Print out the pattern onto paper or T-shirt transfer material. If you don’t want to spend the money on a T-shirt transfer, you can just print the pattern onto some stationery paper (Reduce the pattern by about 10%, so you have enough room to fold the top down over a wooden dowel) that has a little bit of texture to it and still make a pretty banner.
2. Cut the banner out using pinking shears if you have them leaving enough room at the top to fold down the top and make a sleeve to put the wooden dowel through. If not, you can make the edges interesting by pulling some of the threads away from the sides of the banner.
3. Fold over the top edge and glue or sew it down to make a sleeve for your wooden dowel.
4. Color the banner with watercolor markers or anything else that works.
5. To finish, insert the wooden dowel (you can place wooden beads at the ends of the dowel) and tie a ribbon on the dowel to hang the banner.
Copyright
Copyright © 2000, Digital by Design, Inc.
Danielle’s Place of Crafts and Activities
http://www.daniellesplace.com
All rights reserved. No part of this publication may be reproduced or transmitted in any form or by any means, electronic or mechanical, including photocopying and recording, or by any information or storage retrieval system, except for local church or school use only. This copyright notice must be included on all copies. Requests for permission to copy this material for any other uses should be addressed to Carolyn Warvel, 588 Duran Street, Henderson, NV 89015, or e-mail me at
Comments
Our children completed a month’s worth of lessons (mid-week) on Fruit of the Spirit, and I am the Vine. The children and the teachers truly enjoyed it. We have an extensive range of children aged 4 through about 11. I used the clipart with the younger children to create coloring sheets and let the older children be creators of our bulletin boards. It’s so fun to see the children bring their parents by and point out what they have done. As suggested, I used plastic fruit and played the pass-around game as well as a matching game to reinforce memorization. Each small group rotated through a workshop where they had a lesson on self-control (healthy eating habits displayed by Daniel in captivity) and finished by making their own fruit salad from a buffet of the fruits we had been using in large group activities (we substituted mini marshmallows for gentleness). The fruit salad was quite a hit! As a small church, I volunteer and must scrounge for teaching materials. Your website is a treasure trove that I always go to first. The subscription cost has more than paid for itself! Thank you. Rhonda
I teach 5 – 6 yr olds in children’s church. We just completed the series the fruit of the spirit. We studied a different fruit each week. I used the bulletin board suggested. I went to a local teacher’s store, die-cut the fruit, and laminated it with each lesson. We also learned the song Fruit of the Spirit. After we learned all the fruits of the spirit, I made an 8 x 12 poster for each Fruit of the Spirit and placed the appropriate fruit on it. I let the children choose which fruit they wanted to be, and when they sang the song, they raised their fruit over their heads. They loved this. I believe the combination of the lesson and song will stay with them forever. I love this site. The lessons are great, and the crafts are inexpensive. Our church is small, and resources are limited. I especially enjoy the series. The children enjoyed this so much that we are singing the song and telling Big Church what they learned this Sunday. Barbara, New Middleton Baptist Church